Wednesday, 10 October 2018

Move VMs from one host to another host

Follow the below steps to Move/Migrate VM's from one host to another host using V-sphere Client.


Step1.

* Select the particular VM which you want to move to another host.
* Right click the VM and select 'Migrate' option
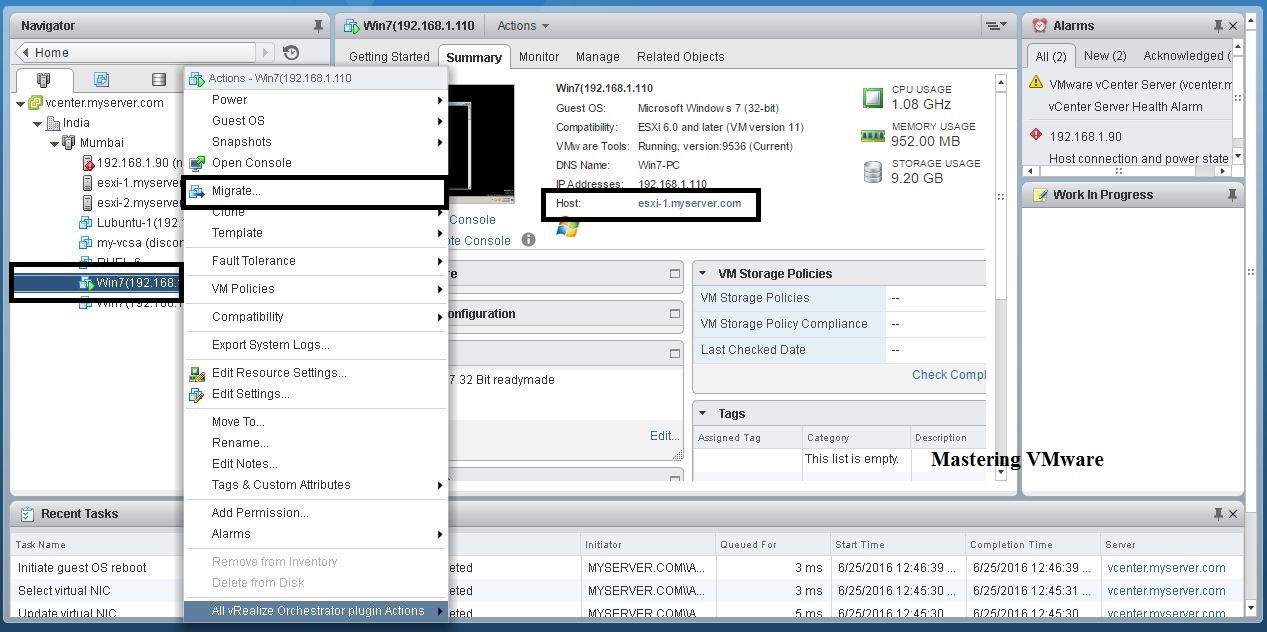
Related image 

Step2.

* Select 'Change Host' option.


Step3.

* Choose the Host where you like to move the VM.


Step4.

* Select 'High Priority' and click Next. 


Friday, 10 April 2015

 Enable/Block USB Ports through Regedit in Windows

Follow the below steps


1. Click Start, and then click Run.
2. In the Open box, type regedit, and then click OK.
3. Locate, and then click the following registry key: HKEY_LOCAL_MACHINE\SYSTEM   \CurrentControlSet\Services\UsbStor
4. In the right pane, double-click "Start".
5. In the Value data box, type "3" (without quotes), click Hexadecimal (if it is not already selected), and then click OK. Note :- if 3 is entered it will open the port and if 4 is entered it will close the port.
6. Quit Registry Editor.

Friday, 17 October 2014

Lync Server 2010 Control Panel "Insufficient access rights to perform the operation"

Lync Server 2010 Control Panel "Insufficient access rights to perform the operation"


Active Directory operations failed on "lyncfe.server.local".  You cannot retry this operation: "Insufficient access rights to perform the operation 00002098: SecErr: DSID-03150E8A, problem 4003 (INSUFF_ACCESS_RIGHTS), data 0"

image

The resolution is to open the user account using Active Directory Users and Computers.
Remember to turn on Advanced Features in AD Users and Computers.
Locate the user and select the security tab, click advanced and select "Include Inheritable Permissions from this object's parent" on the user object:

image


Now you should be able to change the Lync settings for this user.


Monday, 14 July 2014


Part 1 of 2: Installing Telnet

  1. Activate Telnet in Windows 7 Step 1 Version 3.jpg
    1
    Open the Control Panel. By default, Telnet is not installed with Windows 7. It will need to be manually activated in order for you to use it. You can do so through the Control Panel, which can be accessed from the Start menu.
    Ad
  2. Activate Telnet in Windows 7 Step 2 Version 3.jpg
     
    2
    Open "Programs and Features" or "Programs". The option available to you will depend on whether your Control Panel is in Icon or Category view, but they both take you to the same place.
  3. Activate Telnet in Windows 7 Step 3 Version 3.jpg
     
    3
    Click the "Turn Windows features on or off" link. You may be asked for the Administrator password.
  4. Activate Telnet in Windows 7 Step 4 Version 3.jpg
     
    4
    Find the "Telnet Client" entry. In the list of available features, you will see an entry labeled Telnet Client. You may have to scroll down to find it. Check the box next to Telnet Client, and click OK.
    • You may have to wait a minute or two for the client to be installed after selecting it.
  5. Activate Telnet in Windows 7 Step 5 Version 2.jpg
     
    5
    Install Telnet through the command prompt. If you'd rather do everything through the Command Prompt, you can install Telnet with a quick command. First, open the Command Prompt by typing cmd into the Run box. At the command line, type pkgmgr /iu:"TelnetClient" and press Enter. After a moment, you will be returned to the command prompt.[1]
    • Restart the command prompt to begin using Telnet.

Part 2 of 2: Using Telnet

  1. Activate Telnet in Windows 7 Step 6.jpg
     
    1
    Open the Command Prompt. Telnet runs through the Command Prompt. You can access the command prompt by pressing Win and typing cmd into the Run field.
  2. Activate Telnet in Windows 7 Step 7 Version 2.jpg
     
    2
    Start the Telnet client. Type telnet and press Enter to start Microsoft Telnet. The Command Prompt will disappear, and you will be taken to the Telnet command line, displayed as Microsoft Telnet>.
  3. Activate Telnet in Windows 7 Step 8 Version 2.jpg
     
    3
    Connect to a Telnet server. At the Telnet command line, type open serveraddress [port]. You have successfully connected to the server when you receive either a welcome message or are prompted for your username and password.
    • For example, to watch ASCII Star Wars, type open towel.blinkenlights.nl and press Enter.
    • You can also start a connection directly from the Command Prompt by typing telnet serveraddress [port].
  4. Activate Telnet in Windows 7 Step 9.jpg
     
    4
    Close your Telnet session.Once you are finished administering your Telnet server, you should close your connection before closing the window. To do so, open the Telnet command line by pressing ^ Ctrl+]. Type quit and press Enter to close the connection.[2]

Monday, 5 May 2014

Performing the NTBackup on Exchange Server 2007

Performing the NTBackup on Exchange Server 2007

We got the most important Exchange backup basics covered and now we’re ready for the steps on how to configure your NTBackup. I know this is what you have been waiting for, so let’s get started.
  1. To start, login to your Exchange Server, click on the Start Menu, select Run, type in ntbackup and hit Enter: Backup 1
  2. In the Backup Utility window for NTBackup, click on the Backup tab: Backup 2
  3. You will see all your hard drives listed in this window; you will also see a System State listed, as well as the Microsoft Exchange Server option. Expand the Microsoft Exchange Server all the way down until you are able to see your Storage Groups. In my example below, there are two Storage Groups listed: First Storage Group and Second Storage Group
    Backup 3
  4. Go ahead and check the boxes next to all of your Storage Groups: Backup 4
  5. Next, expand your Local Disk where your Exchange Server was installed and then the Program Files Folder: Backup 5
  6. Locate the Microsoft folder and expand it. You should now be able to find the “Exchange Server” folder. Go ahead and check the box next to it: Backup 6
  7. Now remember, we need to exclude the Storage Group folders from that directory. So expand the Exchange Server folder and then the Mailbox folder: Backup 7
  8. Uncheck the checkboxes next to all of your Storage Group folders. In my example I am unselecting the box next to First Storage Group and Second Storage Group. Backup 8
  9. Alright, we’re almost done here. The last thing we need to remember is to check the box next to our System State, so let’s do this now: Backup 9
  10. Now it’s time for you to select the backup destination. You can select a network drive, a secondary local disk or a media tape: Backup 10
  11. After you have selected your backup destination, click on the Start Backup button: Backup 11
  12. At this point you have two sets of options:
    • Option Set #1 – Choose between appending the backup to the media or replacing the data. I’m going to replace the data.
    • Option Set #2 – Start the backup right away, or create a schedule. In my example, I’m going to start it right away.
    When you have made your selections, click on the Start Backup button to start the actual backup process:
    Backup 12
  13. Once the backup is completed you will see the screen below. At this time you have successfully preformed an Exchange Server backup – the Right Way! Backup 13

Attempts to start ClearCase results in "Error: missing dll xml4c_5_6.dll"

Refer below for resolving the ClearCase application Error

Problem(Abstract)

Attempts to start up IBM Rational ClearCase or other products in the IBM Rational Tools suite following a new installation results in "Error: missing dll xml4c_5_6.dll".

Symptom

Starting ClearCase or other products in the Rational Tools suite, following a new install of the Rational Tools (version 7.1.1), results in the following error:
Error: missing dll xml4c_5_6.dll


Cause

The dll file xml4c_5_6.dll is missing from the \bin directory in the path C:\Program Files\IBM\RationalSDLC\ClearCase\bin.

Cause 1:
An incorrect installation failed to copy the DLL file to the correct location.

Cause 2:
The path length to the \ClearCase directory is longer than 256 characters. In this circumstance the DLL file may not copy to the \bin directory as expected.

Diagnosing the problem

Count the character length of the path up to the \ClearCase directory to see if it is greater than 256 characters.

Resolving the problem

Match the corresponding solution to the Cause above to resolve the issue:
Solution 1:
Copy the xml4c_5_6.dll file from C:\Program Files\IBM\RationalSDLC\Common to C:\Program Files\IBM\RationalSDLC\ClearCase\bin.
Solution 2:
If the path to the ClearCase directory is more than 256 characters you should reduce the installation path length less than 256 characters.

Wednesday, 12 March 2014

Print spooler keeps stopping on Windows XP/ Windows 7


Clear Printer Spooler Files and Enable the Spooler Service


 * Follow the below step.


1. Click Start, type "Services.msc" (without the quotation marks) in the Search box and press Enter.

2. Double-click "Printer Spooler" in the Services list.

3. Click Stop and click OK.

4. Click Start, type "%WINDIR%\system32\spool\printers" in the Start Search box and press Enter, delete all files in this folder.

5. Click Start, type "Services.msc" (without the quotation marks) in the Start Search box and press Enter.

6. Double-click "Printer Spooler" in the Services list.

7. Click on Start. In the Startup Type list, make sure that "Automatic" is selected and click OK.


Thanks & Regards
Jeseer CM